
Your cart is currently empty!
The ETS and Pramp Waterslide
Reading Time: 3 minutes
After 20 years of watching patients fight with ventilators like they’re wrestling alligators, I’ve learned a thing or two about making NIV less miserable. Those fancy Hamilton T1s aren’t much good if your patient’s fighting it tooth and nail. Let’s talk about those pesky settings that can make the difference between a calm shift and absolute chaos: Expiratory Trigger Sensitivity (ETS) and Pressure Ramp (Pramp).
ETS: The “Get Me Outta Here” Button
Think of ETS as the bouncer deciding when the party in the lungs is over. It’s the switch that flips from “blow in” to “let ’em breathe out, for Pete’s sake.”
The numbers game:
- Usually set between 25-75% of peak inspiratory flow
- Lower number (25-40%): Machine keeps pushing longer = longer inspiratory time
- Higher number (50-75%): Machine backs off earlier = shorter inspiratory time
Who needs what:
- Your COPD patients with air trapping? Higher ETS. They need to start exhaling sooner.
- Restrictive lung disease folks? Go for a lower ETS. They need that extended inspiratory support.
The light switch explanation I give patients:
- Low ETS: “The machine keeps helping you a bit longer, like slowly dimming the lights instead of just cutting them off.”
- High ETS: “The machine stops pushing air in quickly, like flipping a light switch off fast. Gives you more time to breathe out.”
When things go sideways:
- Too low? Your patient might feel they can’t exhale when they need to.
- Too high? They might not get enough support before cycling to expiration.
The trick is getting the machine to dance with your patient, not step on their toes.
Pramp: The Gentle (or Not-So-Gentle) Approach
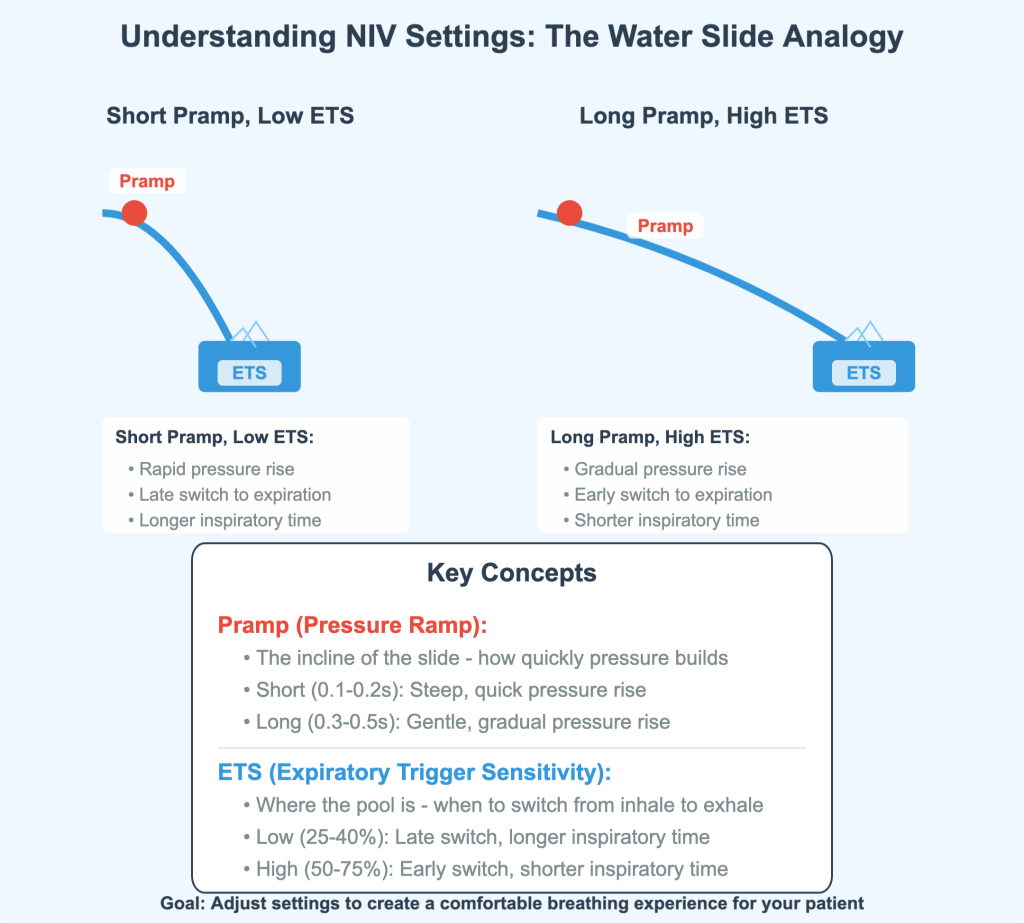
Pramp is how quickly the pressure builds up. In my mind, it’s the difference between easing into a hot tub versus cannonballing into it.
The clock settings:
- Usually 0.1-0.5 seconds
- Shorter time (0.1-0.2): BAM! Pressure hits fast
- Longer time (0.3-0.5): Eaaasy does it…pressure builds gradually
Who appreciates what:
- Acute respiratory distress? Might need that quick hit of pressure.
- Anxious patient or sensitive airways? Ease into it, cowboy.
The faucet talk I give families:
- Short Pramp: “It’s like turning on a fire hose – full blast immediately.”
- Long Pramp: “More like turning on a garden hose slowly so it doesn’t spray everywhere.”
Red flags:
- If your patient flinches with every breath like they’re being punched, lengthen that Pramp.
- If they’re working harder than a one-legged man in a butt-kicking contest, shorten it.
The goal is to match the pressure rise with how your patient naturally breathes in.
The Water Slide Theory (Yes, I Actually Use This)
When I’m training newbies, I tell them to picture a water slide:
Pramp is the steepness of the slide:
- Short Pramp = steep slide = WHEEE (or AHHH!)
- Long Pramp = gentle slope = smooth sailing
ETS is where you splash into the pool:
- High ETS = pool’s right there = quick splash (shorter inspiratory time)
- Low ETS = longer slide before the splash (longer inspiratory time)
The goal? Find the perfect slide-to-pool ratio so your patient isn’t white-knuckling the rails or falling asleep on the way down.
When Things Hit the Fan: Quick Fixes
ETS problems:
- Patient sounds like they can’t get enough air out? Increase that ETS (try 60% instead of 40%).
- Not getting enough inspiratory support? Lower it (maybe 30% instead of 50%).
- Looks like they’re being cut off mid-inspiration? Decrease it.
Pramp issues:
- Patient jumps with each breath like they’re being zapped? Lengthen that Pramp (0.2 to 0.4 seconds).
- Sucking air like they’re trying to inhale through a coffee stirrer? Shorten it (0.4 to 0.2 seconds).
- Out of sync worse than my dad at a wedding dance? Adjust accordingly.
Patient Comfort Checklist
Look, at the end of the day, it’s about making your patient comfortable:
- Listen to what they tell you – even if they can’t talk, their face will speak volumes
- Watch that chest rise and fall – should be smooth, not jerky
- Check for accessory muscle use – if their neck looks like they’re bench pressing, something’s off
- Make sure that mask fits right – I’ve seen more leaks than a sieve boat, and none of them help
Important Reminders (Because My Supervisor Makes Me Say This)
- These are just guidelines from a guy who’s seen it all. Every patient is unique.
- Yes, you should still read the Hamilton T1 manual (though I keep mine as a coffee coaster).
- Only qualified folks should be changing these settings (which means you’ve been shown how and didn’t fall asleep during training).
The whole point of understanding ETS and Pramp is to make your patients feel like the ventilator is helping, not waterboarding them. Nail these settings, and you’ll have patients actually thanking you instead of begging you to “take this thing off me!”
Stay safe out there, and may your patients always synchronize with their vents!