After 15 years of teaching future and current healthcare heroes, I’ve come to a conclusion that might ruffle some feathers in our education department: it’s time to unplug the projectors and reclaim our whiteboards. PowerPoint has dominated nursing and paramedic education for years, but like a patient who’s been on a medication too long, it’s time to reassess and change our treatment plan.
Why We Need to Break Up with PowerPoint
Death by Bullet Point
We’ve all been there – staring at slide 47 of 83, watching our students’ eyes glaze over as we click through yet another bulleted list. In healthcare education, where understanding pathophysiology can mean the difference between life and death, we’ve reduced complex concepts to forgettable bullet points. Last week, I caught myself reading directly from my slides about shock management. If I’m boring myself, what hope do my students have?
The Illusion of Teaching
PowerPoint creates a dangerous illusion that information displayed equals information learned. I can cram 200 slides worth of cardiac pharmacology into a two-hour lecture and technically “cover” everything. But what have my students actually retained? About as much as our patients remember from those discharge instructions we hastily review.
The Barrier Effect
That glowing screen creates a physical and psychological barrier between instructor and student. I’ve noticed I stand differently when teaching with PowerPoint – anchored near the computer, focused on advancing slides rather than reading the room. In a profession where connecting with patients is crucial, why are we modeling disconnection in the classroom?
The Passive Learning Trap
PowerPoint naturally encourages passive consumption rather than active participation. It’s the educational equivalent of placing a patient on a cardiac monitor but never actually assessing them.
The Whiteboard Revolution: Why Marker is Mightier Than Projector
Forced Thoughtfulness
When I’m limited to a whiteboard, I must distill information to its essential elements. No more cramming 17 points about sepsis onto one slide. This constraint forces me to really think about what students absolutely need to know – exactly the kind of prioritization we expect from them in clinical practice.
The Power of Process
Drawing out the inflammatory cascade step-by-step on a whiteboard mirrors how we want students to think through patient presentations. They see the development of ideas in real-time, not just the final product. The journey becomes as important as the destination.
Authentic Engagement
There’s an almost magical quality to teaching with a whiteboard. When I put down the clicker and pick up a marker, students instinctively lean forward. Questions flow more naturally. The classroom feels more like a conversation and less like a TED talk.
Adaptability in Action
Healthcare is unpredictable – our teaching should model this reality. When a student asks an unexpected but brilliant question about a medication interaction, the whiteboard lets me pivot instantly, drawing new connections that weren’t in my “slide deck.” This adaptability is exactly what we need to instill in future clinicians.
The Secret Weapon: Scented Markers and Multisensory Learning
I have a confession that might cost me my “serious educator” card: I’m a devoted fan of scented whiteboard markers. And no, it’s not just because I enjoy writing about hypoxia with markers that smell like blueberries.
There’s method to this aromatic madness. Research shows that multisensory learning—engaging multiple senses simultaneously—creates stronger neural connections and improves retention. When I use my carefully curated collection of scented markers, I’m actually employing a stealth educational strategy.
The Science of Scent and Memory

The olfactory bulb has direct connections to the amygdala and hippocampus, brain regions involved in emotion and memory. This anatomical relationship explains why smells can trigger such powerful memories. When I teach cardiac medications using a cinnamon-scented red marker for vasodilators, students form an additional sensory connection to the concept.
Strategic Implementation (Without Gassing Your Students)
A few practical tips from a scented marker enthusiast:
- Color-code with purpose: Reserve specific scents/colors for specific types of information
- Use sparingly: Save scented markers for the most critical concepts
- Ventilation matters: Ensure your classroom has adequate airflow
- Ask about sensitivities: Some students may have fragrance allergies
- The surprise factor: Occasionally hand a student a scented marker when they come to the board—the unexpected pleasant surprise boosts engagement
My most successful implementation? Using mint-scented green markers for anything related to oxygenation or breathing. During a recent ACLS recertification, a former student told me, “Every time I smell mint, I think about adequate ventilation rates. It’s saved me from bagging too fast more than once.”
Just remember—the goal is positive association, not chemical warfare. A subtle hint of grape when discussing cyanosis is effective; turning your classroom into a fruit-scented fog is not.
Addressing the Concerns (Because I Hear You Objecting)
“But students want the slides for studying!”
Instead of slides, provide concise handouts of key concepts before class. This gives students a framework while still requiring active engagement with the material during class.
“What about showing videos and images?”
Keep a computer handy for the occasional high-quality visual or video. But make it the exception, not the rule. I’ve found that strategic use of a few images has more impact than a constant barrage.
“I’m not artistic enough!”
Neither am I! My stick figure drawings of pulmonary edema have become legendary for their awfulness. But students remember them precisely because they’re imperfect and often accompanied by my self-deprecating commentary. Perfect is the enemy of memorable.
“It takes too much time!”
Yes, writing takes longer than clicking. That’s exactly the point. The natural pacing of whiteboard teaching matches the natural processing speed of the human brain. We’re not trying to “cover material” – we’re trying to uncover understanding.
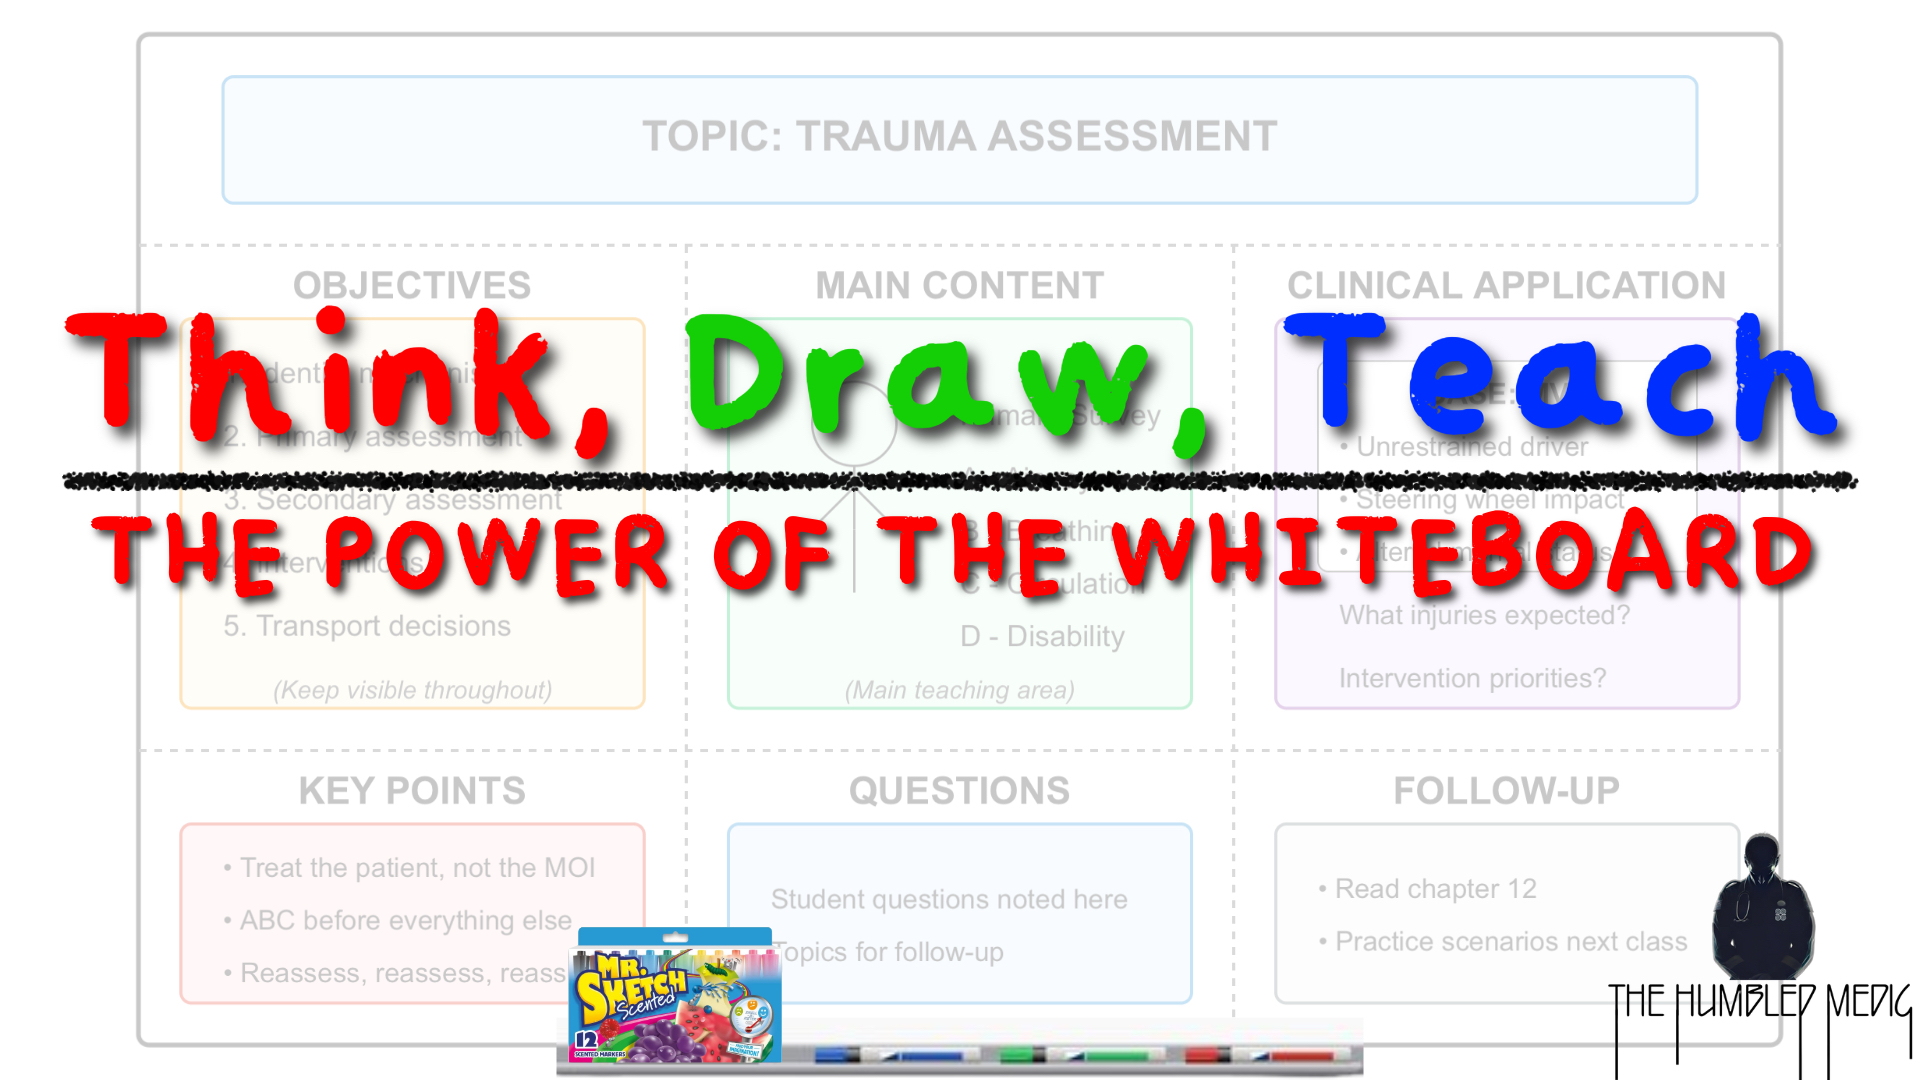
The Art of Whiteboard Organization: Layouts That Enhance Learning
Converting to whiteboard teaching doesn’t mean abandoning structure. In fact, thoughtful organization of your board is crucial to its effectiveness. Here are four proven layouts that work particularly well for medical education:
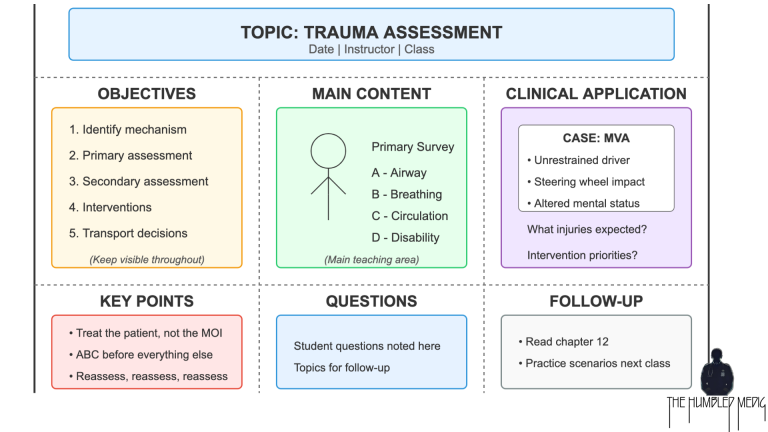
1. Classic Three-Column Layout
Best for: Standard lectures and systematic topics
This workhorse layout divides your board into three vertical sections:
- Left Column: Learning objectives that stay visible throughout the session
- Middle Column: Your main teaching area for diagrams and key concepts
- Right Column: Clinical applications and real-world scenarios
The beauty of this system is its clarity—students always know where to look for specific types of information. I use this layout for most of my foundational lectures, from shock management to respiratory assessment.
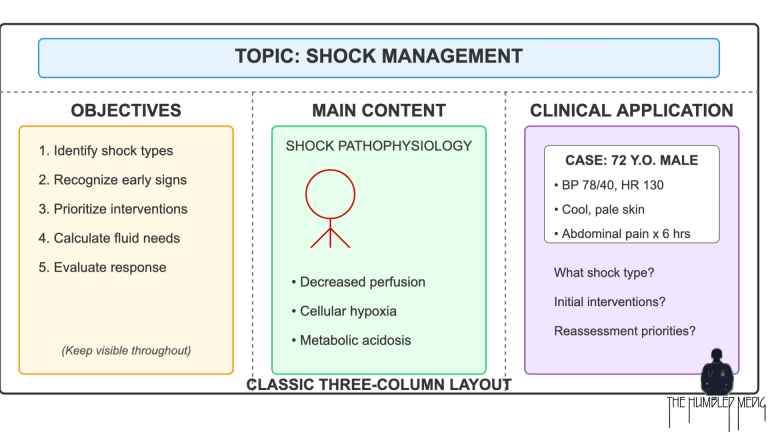
2. Conceptual Map Layout
Best for: Complex interconnected topics
When teaching topics with many relationships (like cardiovascular assessment), this layout places the central concept in the middle with related concepts radiating outward. The visual connections help students see relationships rather than memorize isolated facts.
I’ve seen dramatic improvements in comprehension when teaching pharmacology this way—starting with the drug class in the center, then branching out to mechanisms, indications, contraindications, and side effects.
3. Chronological Flow Layout
Best for: Process-based topics with clear sequences
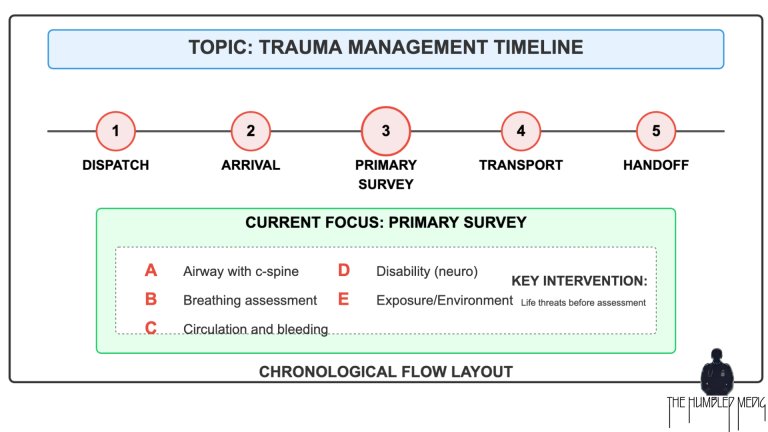
For topics where order matters critically (like trauma management or code algorithms), this horizontal timeline approach shows progression clearly. Each step gets equal visual weight, and you can expand the current focus area in the space below.
My trauma students particularly benefit from seeing the entire patient journey—from dispatch through primary assessment to transport and handoff—as a continuous process rather than disconnected slides.
4. Problem-Based Layout
Best for: Case-based learning and clinical reasoning
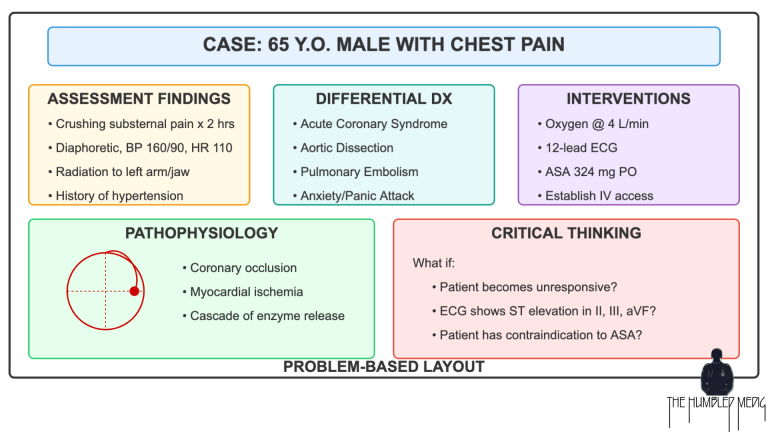
Start with a patient scenario at the top, then build out sections for assessment findings, differential diagnoses, interventions, underlying pathophysiology, and critical thinking challenges. This mirrors actual clinical practice where you begin with a problem and work toward solutions.
This layout transforms abstract concepts into practical application. When teaching chest pain, seeing the full picture—from presentation to intervention—helps students build strong mental models they can apply in the field.
5. The Humbled Medic Layout- THIS IS MY GO TO!!
The Power of Dual Whiteboards: Double Your Teaching Impact
If you’re fortunate enough to have a classroom with multiple boards, the dual whiteboard approach can revolutionize your teaching. Here’s how I use this setup:
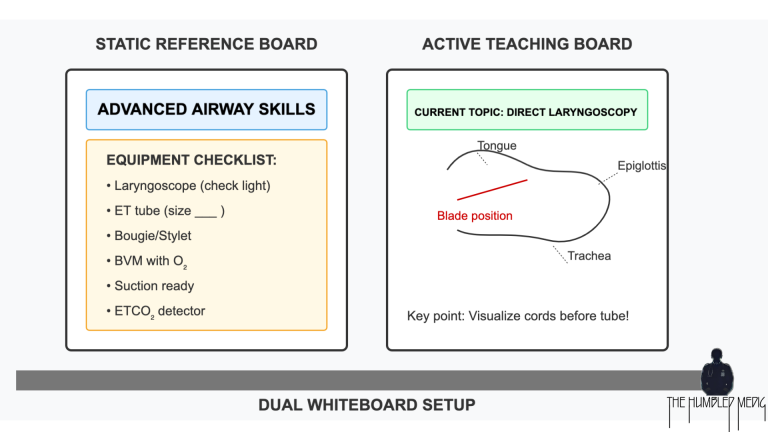
The Static Reference Board
The left (or upper) board remains relatively unchanged throughout the class session. This is where I put:
- Learning objectives
- Equipment checklists
- Key algorithms or formulas
- Critical reference information
This “anchor” board provides stability and context, helping students orient themselves throughout the lesson.
The Active Teaching Board
The right (or lower) board is where the dynamic teaching happens:
- Step-by-step demonstrations
- Response to questions
- Current topic focus
- Evolving case scenarios
The magic happens in the interplay between these boards. I can refer back to the static information while developing new concepts on the active board. This approach mimics how clinicians think—maintaining awareness of protocols while adapting to the current patient situation.
Implementation Tips for Dual Boards
- Color-code each board differently (cool colors for reference, warm colors for active teaching)
- Consider using horizontal tape to create consistent sections across both boards
- When I’m teaching a complex procedure like intubation, I can keep the equipment list visible while drawing the anatomical structures
- For skills sessions, the static board can display critical decision points while the active board walks through the current step
If your classroom only has one board, you can simulate this dual approach by using tape to create a permanent section that stays untouched during your session. Even a small dedicated area for key points can provide the same cognitive benefits.
The Digital Evolution: Smart Whiteboards That Capture Your Work
While I’m advocating for a return to marker-based teaching, I’m not completely anti-technology. Digital smart whiteboards offer a perfect hybrid solution that combines the spontaneity of whiteboard teaching with the shareability of digital content.
Benefits of Capturing Whiteboard Content
- Instant Student Access: Send images of key diagrams to students immediately after class
- Perfect for Visual Learners: Students can focus on understanding rather than frantically copying diagrams
- Accommodation for Different Learning Needs: Provides accessibility for students with disabilities or those who miss class
- Building a Teaching Library: Save your best explanations and diagrams for future classes
- Student Accountability: When students know the board work will be shared, they can focus on engagement rather than documentation
Implementation Options
- Full Smart Whiteboard Systems: The high-end option with built-in recording and sharing capabilities
- Camera/Smartphone Solution: A budget-friendly option—simply take photos at key points during the lecture
- Hybrid Approach: Use regular whiteboard techniques but periodically capture important sections
Making The Most of Digital Capture
- Plan “capture points” in your lesson where you’ll pause to take a photo
- Create a shared folder or LMS section where students can access the images
- Consider recording your explanations along with the visual (many smart boards can create time-lapse videos)
- Use the captured images in review sessions to reinforce key concepts
One of my colleagues uses a simple document camera positioned at her whiteboard, allowing her to record both the developing content and her verbal explanations. Her students report that these recordings are their most valuable study resource—seeing concepts build step-by-step is far more valuable than reviewing static slides.
Making the Transition: Practical Tips
If you’re brave enough to join the whiteboard revolution, start small:
- Convert one PowerPoint-heavy lecture to whiteboard
- Prepare thoroughly, but focus on concepts rather than content
- Use color strategically (red for critical, blue for assessment, green for interventions)
- Take photos of important board work to share afterward
- Embrace the awkward initial phase—your students will appreciate the authenticity
- Be ready for more questions and discussion than you’re used to
A Final Thought from the Trenches
In my most recent paramedic class, I taught the entire cardiac arrest algorithm using nothing but a whiteboard, colored markers, and some questionable drawings. When exam time came, that cohort scored significantly higher on cardiac scenarios than previous groups.
When I asked what made the difference, one student said: “When I’m in a real cardiac arrest, I don’t see PowerPoint slides in my head. I see you frantically drawing the H’s and T’s while making that weird face you make when you’re emphasizing something important.”
That’s when I knew – it’s time to pull the plug on PowerPoint and rediscover the power of teaching with nothing between us and our students but a marker and our passion for the material.
About the author: Has taught thousands of healthcare providers, owns more whiteboard markers than pairs of socks, and still occasionally turns around with marker on face after a particularly enthusiastic teaching session. Current market value of personal scented marker collection exceeds textbook budget.